How to connect Epson L3150 printer to wifi?
CONNECT EPSON L3150 PRINTER TO WI-FI

First things I wanted to tell you that before starting connecting or using your printer you must used to go through the user guide book for understanding your printer. Now i describe step by step about Epson L3150 printer wireless setup or how to connect to Wi-Fi :-
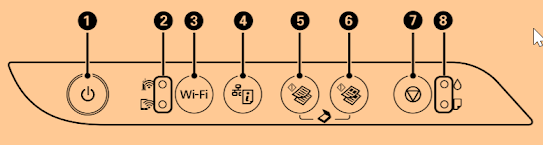
Control Panel Buttons and Lights

1 The power button and light
2 The Wi-Fi and Wi-Fi Direct network status lights
3 The Wi-Fi button
4 The network status button
5 The B&W copy button
6 The color copy button
7 The stop button
8 The ink and paper light
⬤ First press power on button to start the printer.
Wi-Fi Direct Mode Setup
You can enable Wi-Fi Direct mode to allow direct communication between your product and computer or other devices without a wireless router or access point. Make sure paper (A4 size) is loaded before you begin.
Note: If you are printing from a computer/mobile phone, first go to playstore /microsoft store & install Epson iprint.
1. Hold down the Wi-Fi button and press the network status button until the Wi-Fi light and Wi-Fi Direct light flash alternately. Then release both buttons. After both lights stop flashing, the Wi-Fi Direct light remains on.
2. Hold down the network status button for about seven seconds to print a network status sheet.
3. Use your computer or wireless device to select the Wi-Fi network name (SSID) and password listed in the Wi-Fi Direct section of the network status sheet.

NETWORK STATUS SHEET (image credit :-kumarjanglu.online)
You should now be able to print to your product directly from your computer or device. If you cannot print successfully, repeat the process above and make sure you enter the password exactly as written on the network status sheet.
⬤ Go to playstore & install Epson iprint and if you already install then go to next step.
⬤ Close software & turn off data and turn on mobile/computer Wi-Fi.
⬤ Put Wi-Fi direct password here
⬤ Now open Epson iprint app.
⬤ Open printable document and select the document which you want to print.
⬤ Click on print button and a new page appear for selecting printer type
⬤ Now select your printer type and then open Wi-Fi setting and go back.
⬤ Here you select how many page you want to print and color of the pages and many more thing .
⬤ After selecting all these click on print button and see your printer
⬤ Now you successfully print your document .
Using WPS to Connect to a Network
If you have a WPS-enabled router or access point, you can use Wi-Fi Protected Setup (WPS) to connect your device to the network.
Note: To check if your router is WPS-enabled, look for a button labeled WPS on your router or access point. If there is no hardware button, there may be a virtual WPS button in the software for the device.
Check your network product documentation for details.
1. Press the WPS button on your router or access point.
2. Hold down the Wi-Fi button on your product for about five seconds until the Wi-Fi light and WiFi Direct light flash alternately. The Wi-Fi light turns green to indicate a successful connection.
Note: Be sure to press and hold the Wi-Fi button on your product within 2 minutes of pressing the WPS button on your router or access point. Parent topic: Wi-Fi Protected Setup (WPS) Related references Product Light Status
Connecting to a New Wi-Fi Router
If you change the wireless router you have been using on your network, you need to update your
product's Wi-Fi connection to the new router.
Note: If you switch to a 5 GHz wireless router, set the router to operate in dual band (2.4 GHz and
5 GHz) mode. If your router uses a single network name (SSID) for both the 2.4 GHz and 5 GHz band,
give each band its own network name (SSID) instead, such as Home Network 2.4 GHz and Home
Network 5 GHz.
See your router documentation for instructions.
1. Do one of the following:
• Windows: Uninstall your product software.
• Mac: Go to the next step.
2. Download and install your product software from the Epson website using the instructions given in user guide
Disabling Wi-Fi Features
You may need to disable your product's Wi-Fi features if you change your network connection type or
need to solve a problem with your network connection. You can disable the Wi-Fi features by resetting
the network settings to their default values.
Note: Before disabling Wi-Fi features, make a note of your product's SSID (network name) and
password, and any network settings selected for the Epson Connect services you may use. These
settings will be reset to their default values.
1. Turn off the product.
2. Hold down the network status button and press the power button until the Wi-Fi light and
Wi-Fi Direct light flash alternately. Then release both buttons.
When the Wi-Fi light and Wi-Fi Direct light turn off, Wi-Fi is disabled.


Comments